How to Install a Wafer Check Valve (Step-by-Step)
Quick Answer
To install a wafer check valve correctly, match the flow arrow to pipeline direction, and install horizontally or in vertical upward flow. Maintain five pipe diameters of straight pipe before and after the valve. Use compatible flanges and gaskets, tightening bolts in a crisscross pattern with gradual torque. Finally, retighten bolts after initial operation to prevent leaks and ensure optimal performance.
Installing a wafer check valve correctly is essential to ensure proper flow control, prevent backflow, and extend the valve’s service life.
This guide explains wafer check valve installation, including orientation and flow direction, to help you avoid common mistakes and ensure optimal performance.
👉 Before installation: Learn product details → Wafer Type Check Valve
👉 After installation: Maintenance guide → How to Clean a Swing Check Valve
4 Important Steps to Wafer Check Valve Installation
Step 1. Check Valve Orientation
Flow Direction: Before installation, check the arrow on the valve body. This arrow indicates the direction of fluid flow. Ensure that the valve is installed with the arrow pointing in the correct flow direction. Installing it incorrectly will result in valve failure.
Pipeline Position: Wafer check valves can be installed in horizontal or vertical upward flow pipelines. However, avoid installing them in vertical downward flow pipelines as this could cause malfunction.
Horizontal Installation: When installing the valve in horizontal pipelines, position it so the hinge pin is in a vertical orientation to allow the valve disc to move freely and prevent jamming.
Step 2. Maintain Proper Pipe Length
Straight Pipe Runs: Ensure there are at least 5 pipe diameters of straight run both upstream and downstream of the valve.
This helps prevent turbulence and ensures smooth operation. Avoid placing the valve near elbows, reducers, or any other components that could disturb the flow and cause wear.
Step 3. Prepare the Flanges and Gaskets
Flange Compatibility: Use flanges that match the valve’s flange standard, such as ANSI, DIN, or AS. Ensure the flanges are clean and free of debris.
Gasket Selection: Choose the right gasket material based on the fluid type and operating conditions. Common materials include EPDM for water, NBR for oils, Viton for high temperatures, and PTFE for chemical resistance.
Ensure the gasket thickness is appropriate for the flange type and system pressure.
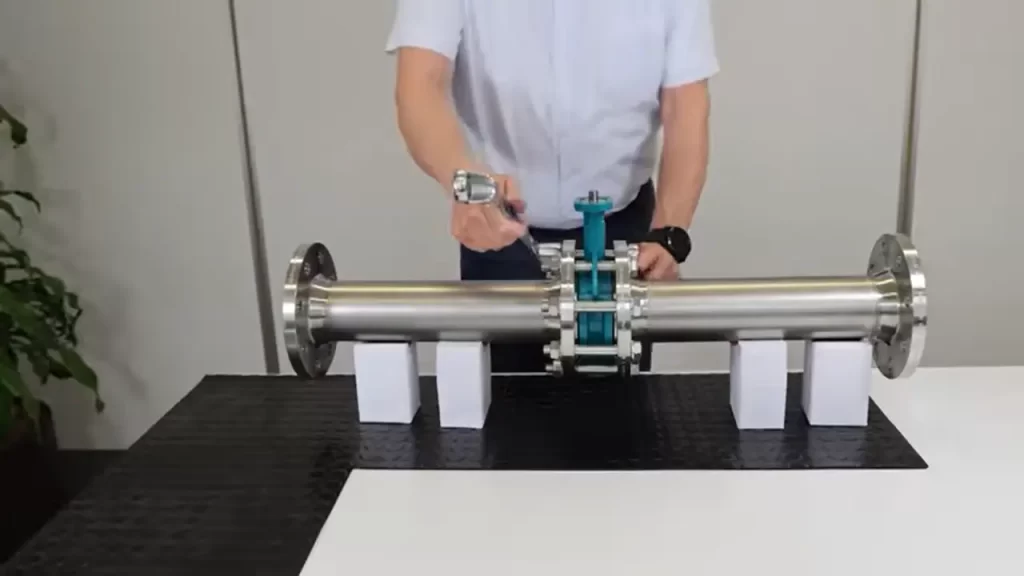
The gap between the flange and the valve body needs to be tightened
Step 4. Bolt Tightening Procedure
Lubricate and Align: Lubricate the flange bolts to facilitate even tightening and prevent galling. Align the flanges and insert the bolts.
Tightening Sequence: Tighten the bolts in a crisscross or diagonal pattern to ensure even pressure distribution across the gasket. This prevents leaks and maintains the valve’s alignment.
Gradual Tightening: Start with a lower torque setting and gradually increase to the final torque specification. This method allows for adjustments and ensures uniform contact between the flange faces and the gasket.
Retightening After Operation: Once the system is pressurized and has been in operation for a short period, check the bolts and retighten if necessary. This compensates for any gasket settling or thermal expansion.
Common Installation Mistakes to Avoid
- Incorrect flow direction: Installing against the flow direction will prevent proper operation.
- Improper flange spacing: Incorrect spacing may damage the valve or cause leakage.
- Installation near turbulence sources: Pumps or elbows can create unstable flow.
- Wrong valve orientation: Especially critical for dual plate check valves.
- Lack of cleaning: Debris inside the pipeline can affect sealing and movement.
Best Practices to Prevent Turbulence and Ensure Optimal Performance
- Distance from Turbulence Sources: Install the valve away from elbows, tees, or pumps to minimize flow disturbances.
- Correct Pipeline Level: Ensure the pipeline angle does not exceed 5 degrees from the horizontal, especially for tilting disc and swing check valves.
- Inspect and Clean: Before installation, inspect the valve and pipeline for debris or damage to prevent flow obstruction and wear.
By following these installation guidelines and best practices, you can ensure a reliable, leak-free, and efficient operation of the wafer check valve in your system.
Search
Categories
Tags
Product
- Ball Valve
- Floating Ball Valve
- Fully Welded Ball Valve
- Trunnion Ball Valve
- Butterfly Valve
- Full Metal-Seated Bi-Directional Butterfly Valve
- High Performance Butterfly Valve
- Three-Eccentric Metal Hard Seal Butterfly Valve
- Check Valve
- Cast Lift Check Valve
- Cast Swing Check Valve
- Wafer Type Check Valve
- DIN Valve
- DIN Bellow Sealed Globe Valve
- DIN Globe Valve
- DIN Rising Stem Gate Valve
- DIN Swing Check Valve
- Forge Valve
- Forged Check Valve
- Forged Floating Ball Valve
- Forged Gate Valve
- Forged Globe Valve
- Gate Valve
- Bellow Sealed Gate Valve
- Flat Gate Valve
- Wedge Gate Valve
- Globe Valve
- Cast Globe Valve
- Plug Valve
- Eccentricity Plug Valve
- Inverted Pressure Balance Lubricated Plug Valve
- Orbit Plug Valve
- Sleeve Type Plug Valve
- Slurry Valve
- Slurry Valve
- Strainer


