Quel est le sens d'écoulement d'un clapet anti-retour ?
Si vous installez régulièrement des vannes, vous connaissez déjà une dure réalité : Un clapet anti-retour installé dans le mauvais sens ne vous pardonnera pas..
Cela peut provoquer :
- Reflux dans les pompes et les compresseurs
- Coup de bélier dans les longs pipelines
- Contamination des lignes propres
- Temps supplémentaire sur place pour couper et inverser la vanne
C'est pourquoi comprendre Le sens d'écoulement du clapet anti-retour est indiqué par le sens du flux. est crucial pour les ingénieurs de projet, les équipes EPC et les responsables de la maintenance. Dans cet article, nous verrons comment clapets anti-retour travail, comment lire le Symbole de sens d'écoulement sur un clapet anti-retour, et ce qu'il faut vérifier avant de serrer un seul boulon de bride.
Que signifie le sens d'écoulement d'un clapet anti-retour ?
Un clapet anti-retour est un valve unidirectionnelle. Son rôle est simple : laisser les médias circuler librement dans un sens et bloquer automatiquement le flux dans le sens opposé.
Donc, quand on parle de sens d'écoulement d'un clapet anti-retour, nous entendons par là le trajet prévu du fluide à travers la vanne :
- Direction avant – la vanne s'ouvre et permet le débit
- Sens inverse – la vanne se ferme et arrête le flux
Si la vanne est installée dans le sens inverse de celui prévu, vous obtiendrez :
- Débit faible ou nul alors que l'on s'attend à un débit maximal
- Ou un flux inverse alors que vous vous attendiez à ce que la ligne soit protégée.
Sur un projet en production, les deux scénarios peuvent engendrer de sérieux problèmes lors de la mise en service.
Comment fonctionne un clapet anti-retour ?
Le principe de base
Derrière chaque conception de clapet anti-retour, le principe est similaire :
- Quand la pression d'entrée est supérieure à la pression de sortie, le disque, la bille ou la plaque interne s'éloigne de son siège et ouvre la soupape.
- Quand La pression s'égalise ou s'inverse, L'élément retourne à son siège et bloque le flux.
Aucune poignée, aucun actionneur ni aucun système de commande n'est nécessaire. La vanne réagit uniquement aux conditions de pression et de débit.
Pourquoi le sens du flux est important pour votre système
Le sens d'écoulement correct n'est pas un simple détail. Il influe directement sur :
- Protection des équipements – empêche le reflux dans les pompes, les compresseurs et les chaudières
- Qualité du produit – empêche la contamination entre les lignes propres et sales
- Sécurité du système – réduit le risque de coups de bélier et de pics de pression
- coûts d'entretien – limite les arrêts non planifiés et les reprises de travaux
Obtenir le Le sens d'écoulement du clapet anti-retour est indiqué par le sens du flux. C'est une mesure peu coûteuse qui protège des équipements très onéreux.
Sens d'écoulement dans les types de clapets anti-retour courants
Les différents modèles de clapets anti-retour gèrent le flux de différentes manières. Comprendre le fonctionnement de chaque type facilite grandement les décisions d'installation.
Clapets anti-retour à battant : comment ils dirigent le débit

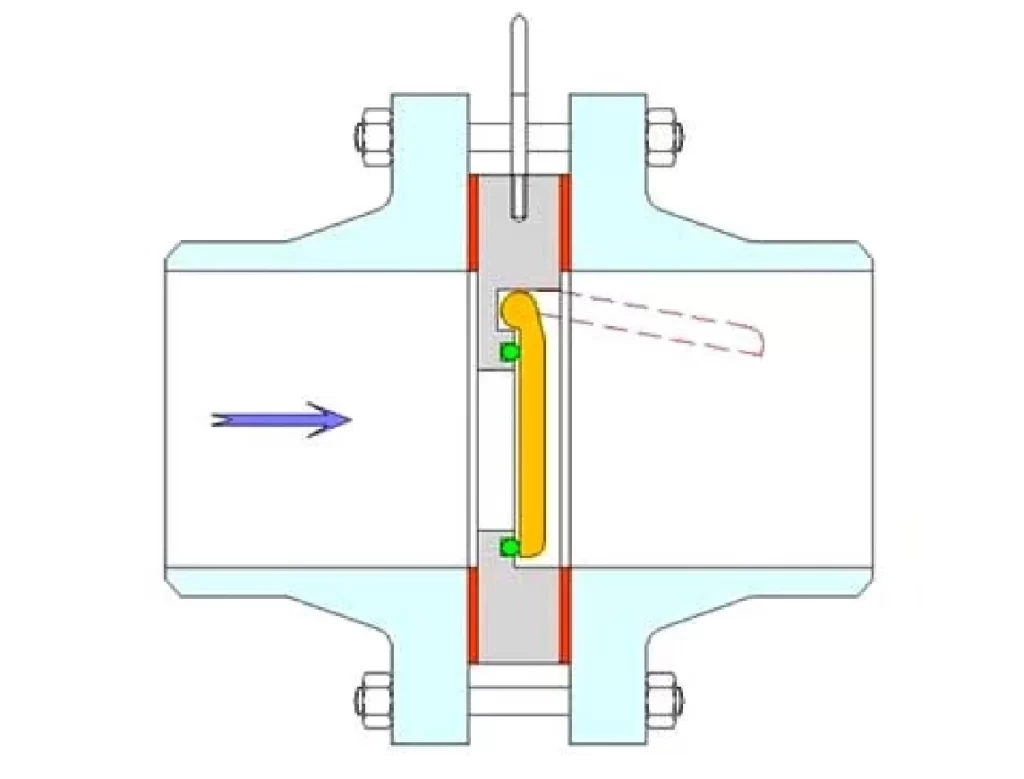
Un clapet anti-retour à battant utilise un disque à charnière qui s'ouvre et se ferme :
- Le flux d'air vers l'avant repousse le disque loin du siège.
- Lorsque le flux ralentit ou s'inverse, le disque revient en arrière et assure l'étanchéité.
En pratique:
- Le côté entrée c'est le côté qui pousse le disque pour l'ouvrir.
- Le côté sortie C'est par là que le support sort lorsque le disque est complètement ouvert.
Les clapets anti-retour sont courants dans les conduites d'eau, de pétrole et de gaz à basse pression.
Clapets anti-retour de levage et leur circuit d'écoulement
Les clapets anti-retour de levage utilisent un disque ou piston qui se déplace verticalement:

- Le flux d'air vers l'avant soulève le disque de son siège.
- Le reflux ou la gravité le ramènent au joint.
Orientation typique :
- Le sens du flux est généralement de bas en haut.
- Des guides internes, disposés en lignes horizontales, maintiennent le disque aligné.
Les clapets anti-retour à levage sont souvent utilisés dans les applications à haute pression ou avec des fluides propres où une étanchéité parfaite est requise.
Clapets anti-retour à bille : côtés entrée et sortie
Un clapet anti-retour à bille utilise un balle en mouvement libre:

- Le flux vers l'avant repousse la bille de son siège vers une cavité.
- Le flux inverse repousse la balle sur son siège.
On peut le voir ainsi :
- Entrée = sithe de qui déloge la balle
- Sortie = côté par lequel le fluide s'écoule une fois que la bille s'est éloignée.
Ces vannes sont courantes dans les boues, les fluides visqueux ou les applications où une construction simple est un avantage.
Clapets anti-retour à plaquette/double plaque en service
Les clapets anti-retour à plaquette et à double plaque sont conceptions compactes monté entre les brides :
- Le flux d'air vers l'avant écarte une ou deux plaques, souvent contre un ressort.
- Le flux inverse et la force du ressort referment rapidement les plaques.
Ils sont largement utilisés dans les espaces restreints, les conduites de refoulement des pompes et les pipelines de grand diamètre où le poids est un facteur important.
Interprétation des symboles des clapets anti-retour et du sens d'écoulement
Sur le terrain, vous partagez votre temps entre les dessins et la fabrication des vannes. Vous devez comprendre le symbole du clapet anti-retour sens d'écoulement sur les deux.
Marquages du sens d'écoulement sur le corps de la vanne
La plupart des clapets anti-retour ont un conduit transparent. flèche moulée ou estampée sur le corps. Cette flèche est la plus directe. symbole de sens d'écoulement du clapet anti-retour dans une installation réelle.
Rechercher:
- Un relief ou une gravure flèche sur le corps
- Le mot “"COULER"” à côté de la flèche
- Marquages d'extrémité tels que “"DANS"” et “"DEHORS"”
Avant l'installation, posez-vous simplement la question suivante : “ La flèche pointe-t-elle dans le même sens que la flèche de flux de la ligne sur le schéma ? ”
Symboles des clapets anti-retour sur les schémas P&ID
Sur les schémas de tuyauterie et d'instrumentation (P&ID), les clapets anti-retour sont représentés par un symbole simplifié avec un clapet, une bille ou un ressort. À côté, les concepteurs ajoutent généralement un Flèche indiquant le sens du flux.
Comprendre le Symbole du clapet anti-retour et sens d'écoulement le dessin vous aide :
- Vérifiez que vous utilisez le type de vanne approprié.
- Orientez correctement le boîtier lors de l'installation
- Repérez toute incohérence entre la conception et le routage sur le terrain
En cas de doute, comparez les flèche de flux P&ID avec le flèche sur le corps de la vanne avant de souder ou de boulonner.
Meilleures pratiques d'installation pour un sens d'écoulement correct
Quelques vérifications simples lors de l'installation peuvent éviter des travaux de reprise coûteux par la suite.
Liste de vérification d'orientation avant le serrage des boulons
Avant de fixer la vanne en place, parcourez rapidement cette liste :
- Associez flèche de ligne sur les isométriques/P&ID avec le flèche sur le corps de la vanne.
- Confirmer numéro d'étiquette La vanne correspond à la liste des vannes.
- Vérifiez que le type de vanne (battante, à levage, à plaquette) correspond au design.
- Pour les conduites verticales, vérifiez que la vanne est homologuée pour cette orientation.
Ce contrôle de 2 à 3 minutes permet souvent d'économiser des heures de découpe et de retouche.
Installation horizontale ou verticale
L'orientation a un impact important sur la performance :
- Clapets anti-retour à battant fonctionnent généralement mieux dans lignes horizontales avec la charnière sur le dessus.
- Certains contrôles de swing peuvent fonctionner sur des lignes verticales, mais uniquement avec un flux ascendant.
- Clapets anti-retour à levage et à plaquettes sont généralement plus flexibles et peuvent convenir aussi bien aux lignes horizontales que verticales, selon les instructions du fabricant.
Suivez toujours le manuel d'installation du fabricant de la vanne plutôt que de vous fier à vos habitudes acquises lors de projets antérieurs.
Erreurs courantes de sens d'écoulement et comment les éviter
Même les équipes les plus expérimentées peuvent commettre des erreurs lorsque les délais sont serrés. Voici quelques exemples d'erreurs typiques :
- Ignorer la flèche sur le corps et installer la vanne à l'envers
- En supposant que les clapets anti-retour soient bidirectionnel
- Utilisation de clapets anti-retour à battant pour flux vertical descendant
- Omission des contrôles d'orientation lors des essais hydrostatiques
- Interprétation erronée du symbole du clapet anti-retour sens d'écoulement sur les dessins
La solution est simple : former les équipes à la lecture des deux symbole de sens d'écoulement du clapet anti-retour sur le corps et les flèches sur les schémas P&ID, et ajoutez une vérification rapide du sens d'écoulement dans votre procédure QA/QC.
Pourquoi choisir PANS pour vos clapets anti-retour et votre assistance technique ?
Choisir un clapet anti-retour ne se résume pas à sa classe de pression et à sa taille. Vous souhaitez également… marquages clairs et documentation fiable pour faciliter l'installation.
En tant que fabricant professionnel de vannes industrielles, Vanne de casseroles fournitures:
- Clapets anti-retour à battant, à levage et à plaquette pour un large éventail de médias
- Flèches de flux clairement indiquées et des légendes moulées pour une orientation facile
- Détaillé fiches techniques et guide d'installation
- Vannes conçues et testées conformément à normes internationales
Pour les entreprises d'ingénierie, d'approvisionnement et de construction (EPC), les équipementiers et les distributeurs, cette combinaison réduit les risques d'erreurs et accélère la mise en service sur site.
Pourquoi tant de projets choisissent-ils nos clapets anti-retour ?
Conçu pour prévenir les erreurs courantes de sens d'écoulement et garantir une installation fiable et correcte à chaque fois.
Voir les spécifications
Conclusion
Quand on considère la situation dans son ensemble, sens d'écoulement d'un clapet anti-retour C'est un petit détail aux conséquences énormes. Installer une vanne à l'envers peut anéantir tout le travail effectué sur le dimensionnement, le choix des matériaux et l'agencement, entraînant un reflux, un coup de bélier et des arrêts de production imprévus.
En vérifiant régulièrement le Symbole de sens d'écoulement sur vos clapets anti-retour En alignant le corps du circuit avec les flèches de vos schémas P&ID, vous donnez à votre système les meilleures chances de fonctionner de manière sûre et efficace dès le démarrage.
Si vous planifiez un nouveau projet ou la modernisation d'une ligne existante et que vous avez besoin de clapets anti-retour fiables avec un marquage clair et un support technique solide, PANS peut aider.
Vous recherchez des clapets anti-retour fiables à battant, à levage ou à plaquette avec un marquage clair du sens d'écoulement ? Contactez PANS Contactez-nous aujourd'hui pour discuter des exigences de votre projet et demander un devis personnalisé.
Points clés à retenir
- Le sens d'écoulement n'est pas optionnel ; la vanne doit être installée de manière à s'ouvrir dans le sens direct du flux et à se fermer dans le sens inverse.
- Respectez toujours la symbolique. Utilisez le symbole de sens d'écoulement sur le corps de la vanne et les flèches d'écoulement sur les schémas de tuyauterie et d'instrumentation comme référence finale.
- Le bon fournisseur facilite la collaboration avec un fabricant comme PANS, qui vous offre un marquage clair et un soutien technique solide pour chaque projet.
FAQ
Q1 : Comment puis-je vérifier rapidement le sens d'écoulement d'une vanne ?
A1 : Repérez la flèche sur le corps de la vanne. Elle indique le sens d’écoulement, de l’entrée vers la sortie. Si aucune flèche n’est visible, vérifiez la présence des marquages “ IN/OUT ” ou consultez la fiche technique de la vanne.
Q2 : Puis-je installer un clapet anti-retour à battant verticalement ?
A2 : Souvent oui, mais uniquement pour un écoulement ascendant. De nombreux clapets anti-retour ne conviennent pas à un écoulement vertical descendant. Consultez toujours les instructions d'installation du fabricant.
Q3 : Que se passe-t-il si j’installe un clapet anti-retour à l’envers ?
A3 : La vanne peut ne pas s’ouvrir correctement, ce qui entraîne une restriction du débit. Dans certains cas, elle peut également ne pas empêcher le reflux, risquant d’endommager les pompes et autres équipements.
Q4 : Tous les clapets anti-retour sont-ils unidirectionnels ?
A4 : Les clapets anti-retour industriels standard sont conçus pour un écoulement unidirectionnel. Si vous avez besoin d’un écoulement dans les deux sens, il vous faudra un autre type de vanne, comme une vanne à guillotine ou une vanne à boisseau sphérique.
Q5 : Les symboles P&ID indiquent-ils toujours le sens d’écoulement ?
A5 : La plupart des schémas de tuyauterie et d’instrumentation (P&ID) comportent des flèches indiquant le sens d’écoulement sur la canalisation, à proximité de chaque symbole de vanne. Si le sens d’écoulement du symbole du clapet anti-retour n’est pas clair, consultez la légende ou l’ingénieur des procédés avant l’installation.
Recherche
Catégories
Mots clés
Produit
- Robinet à tournant sphérique
- Robinet à tournant sphérique flottant
- Robinet à tournant sphérique entièrement soudé
- Robinet à bille à tourillon
- Vanne papillon
- Vanne papillon bidirectionnelle à siège entièrement métallique
- Vanne papillon haute performance
- Vanne papillon à joint dur en métal à trois excentriques
- Clapet anti-retour
- Clapet anti-retour à levage moulé
- Clapet anti-retour à battant en fonte
- Clapet anti-retour de type plaquette
- Vanne DIN
- Vanne à soupape scellée à soufflet DIN
- Robinet à soupape DIN
- Vanne à vanne à tige montante DIN
- Clapet anti-retour à battant DIN
- Vanne de Forge
- Clapet anti-retour forgé
- Robinet à tournant sphérique flottant forgé
- Vanne à vanne forgée
- Robinet à soupape forgé
- Vanne à vanne
- Vanne à guillotine à soufflet
- Vanne à vanne plate
- Vanne à vanne en coin
- Robinet à soupape
- Robinet à soupape moulé
- Vanne à boisseau
- Vanne à boisseau excentrique
- Vanne à boisseau lubrifiée à pression équilibrée inversée
- Vanne à boisseau orbitale
- Vanne à boisseau à manchon
- Vanne à lisier
- Vanne à lisier
- Passoire


